Webcam Images – Another Look
Welcome, haere mai to another GeoNet Data Blog. Today we are going to take another look at our webcam images, focusing on Whakaari/White Island.
One of the first blogs we wrote was webcam image basics. We haven’t returned to webcam images since, despite them being a valuable source of GeoNet data, especially for monitoring volcanoes. With the loss of our on-island monitoring of Whakaari/White Island, images from our webcams on the mainland are now more important than ever, especially with ongoing eruptions. We are going to look at some of the details of our images, talk about some of the difficulties we face, and provide information to help our webcam image data users get the most from the images.
A new camera at Te Kaha
We recently installed a new webcam at Te Kaha, halfway between Opotiki and East Cape. The images from the camera are the same size as our other cameras. The full-size original images we receive from the camera are 2048 x 1538 pixels, and we have the latest image available as thumbnail, medium, and large versions, with labels, using a URL directly in your web browser.
Like our other cameras, the Te Kaha camera has two lenses, one for daytime and one for night-time. It switches between the lenses automatically. Images during the day are colour and those at night are grey scale (black and white).
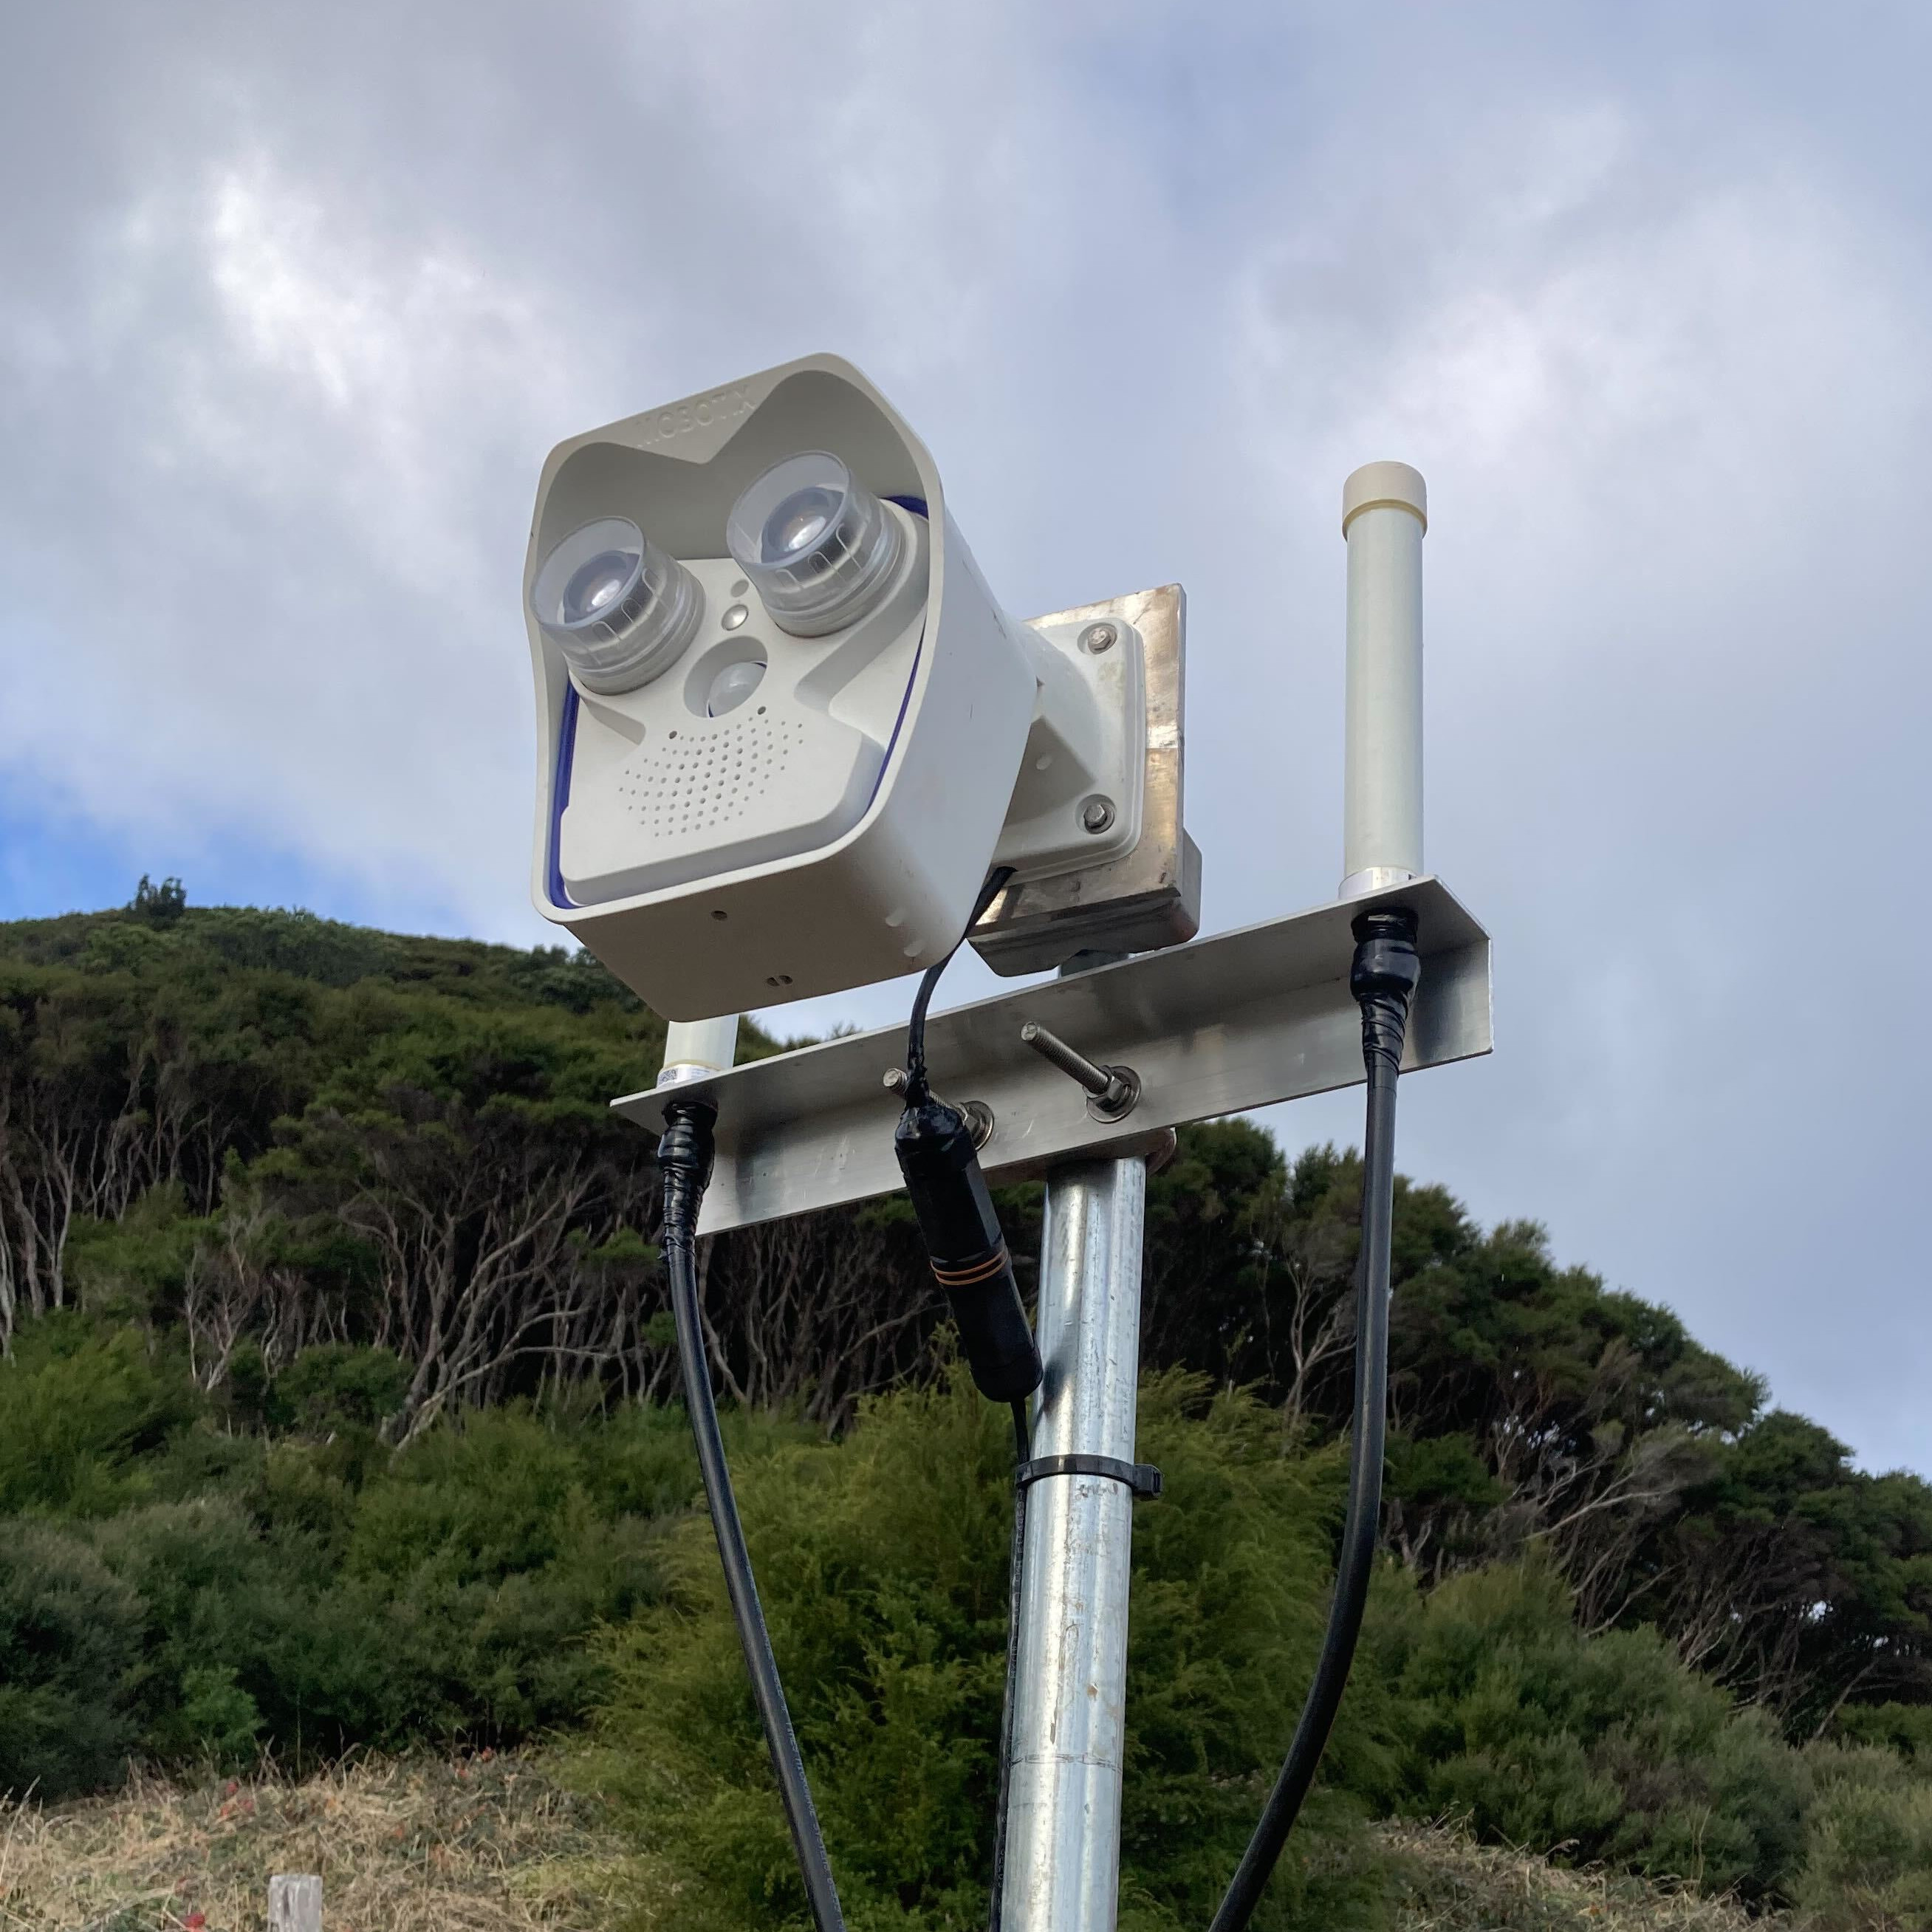
The Te Kaha camera. The camera has two lenses, a night-time lens on the left and a daytime lens on the right.
Lens (and image) offset
Eagle-eyed webcam viewers might have noticed that the view between our daytime and night-time images is slightly different. This is because the two lenses are separate, and the images recorded on the camera’s sensor are displaced.
Two consecutive images, as the camera switches from night-time to daytime lens (or vice versa), show the displacement very clearly, especially if we use the image labels as a reference point. If we use the prominent peak on Whakaari/White Island in the large size labeled images (640 x 480 pixels), the night-time image is displaced about 65 pixels to the left compared to the daytime image. With the other images sizes the displacement (in pixels) won’t be the same amount, it’ll be smaller for thumbnail and medium sized images and larger for the full-size original images.
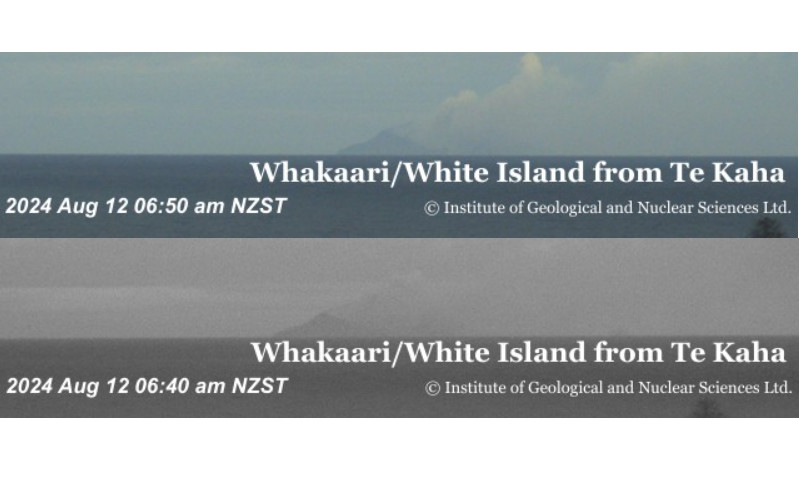
Parts of two consecutive images of Whakaari/White Island from Te Kaha showing the offset between daytime and night-time images.
Better labels
We recently improved the labels written on the thumbnail, medium, and large versions of our webcam images. This was prompted by the new camera at Te Kaha. We already had a camera at Whakatāne viewing Whakaari/White Island and we needed to distinguish images from it and the Te Kaha camera.
Internally, in our camera metadata, we consider a camera to be located at a particular point and viewing a particular subject. We simply transferred that idea over to our image labels. You’ll now notice that most of the camera labels are “XXX from YYY”. XXX is the name of the volcano and YYY is where the image is taken from. If YYY is a well know location, like Whakatāne or Te Kaha, then we use that in the label. If it’s not well known, then we use a direction in the label, like “Ruapehu from North”. If the original camera labels had a direction, such as “Ruapehu North”, we’ve kept that to help you all transition to the new labels, even if the direction isn’t completely accurate. If you want to know where the cameras are located, they are shown on our Volcano Cameras Map page, and now also on our Sensor Map Search page.
There are a couple of images where we haven’t changed the labels to the “XXX from YYY” format: Raoul Island and Tongariro Te Maari Crater. Those were already clear.
One final thing about image labels. For a number of years Whakaari/White Island has commonly been used instead of White Island and we’ve made that change to the labels. We’ve also added a macron to the second “a” in Whakatāne.
Night-time image noise
If you’ve ever looked at the images our cameras take at night you are likely to have noticed they are often quite dark and “noisy”. If there’s full moon and it’s a well-lit night, the image may be brighter, but on a normal night, the exposure the camera makes produces an “underexposed” image that is dark and shows a lot of noise from the camera’s sensor.
We normally setup our webcams to have a maximum exposure time (the longest time the lens is allowed to be open when taking a photograph) of 1/5 second (0.2 seconds). Sorry if it’s a bit confusing but it’s usual to express exposure times (also called shutter speed) as fractions of a second, such as 1/500, 1/250, 1/100, etc.
Our cameras have a fixed aperture (the lens opens the same amount every time a photograph is taken) of f/1.8 (photographers will understand this as a f-stop of 1.8). The main thing to understand is that because the lens always opens the same amount, the exposure (brightness of the image) is determined by the exposure time (shutter speed). A longer shutter speed means a brighter image. On a dark night, an exposure time of 1/5 second often isn’t enough to adequately expose the image, so it’s underexposed and noisy.
We have recently done a little comparison and found that permitting the lens to stay open longer gives better results.
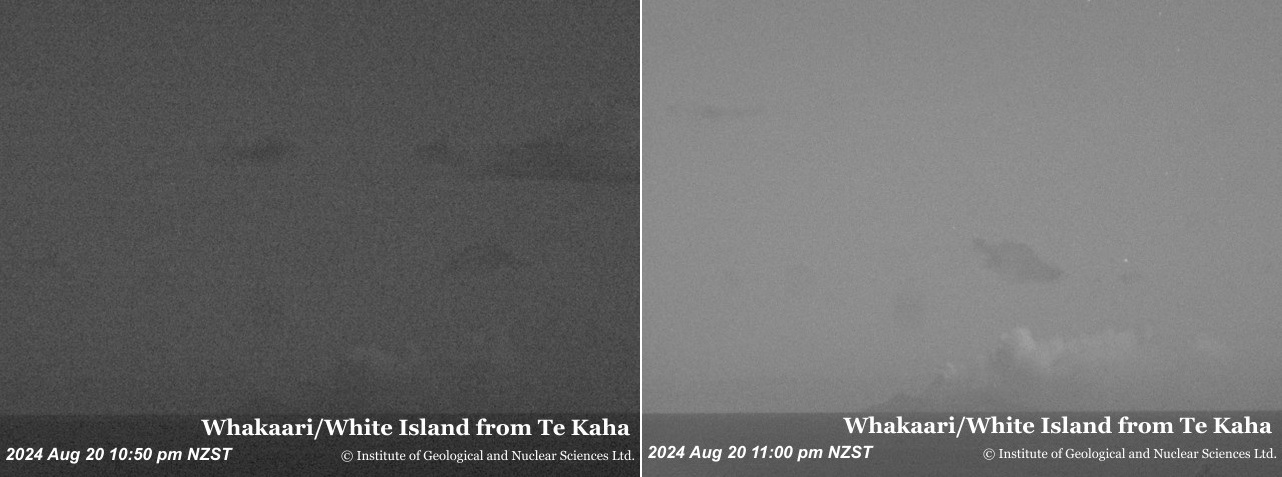
Successive night-time images. The left uses the normal camera exposure settings while the right allows the camera lens to remain open longer.
Aside from not seeing as much, an underexposed and noisy image has an impact on the file size. Our cameras generate the common JPEG file format we are all familiar with. The JPEG format uses an efficient compression algorithm to reduce the size of files by effectively combining nearby pixels of the same colour (or brightness for a grey scale image). If an image contains a lot of essentially random noise, that compression algorithm doesn’t work well, so the resulting file size is larger than we might expect.
To illustrate this, we’ve cropped 100 x 100 pixels from top left of both of the night-time images. We used the same standard deviation calculation we used in the blog about webcam image basics to estimate range of pixel brightness. The underexposed image has a higher standard deviation and hence a greater range of pixel brightness. This translates into a larger file size, 2.2 kilobytes larger for the 100 x 100 pixel crop and 16.8 kilobytes larger for the whole image, a 30% increase over the more correctly exposed image.
A 100 x 100 pixel portion of two night-time images taken by the Te Kaha camera. The left image is underexposed, the right has a more correct exposure.
| Image | Shutter Speed (seconds) | Standard deviation of pixel brightness | File size(100x100px) |
|---|---|---|---|
| Under exposed | 0.17 (1/6) | 0.0179042 | 9471 |
| Correctly exposed | 1.3 | 0.0111891 | 7211 |
You might be wondering what all the fuss is about. Getting a well exposed image is obviously helpful as it allows everyone to see more in night-time images, but does file size really matter that much? Isn’t this the era of fibre broadband and 5G wireless so we shouldn’t have any issues sending larger files back, should we?
As many of our camera sites are remote, they don’t have fibre broadband or 5G wireless, so file size does matter. We’ve been testing streaming one second video from Whakatāne and Te Kaha webcams to our National Geohazards Monitoring Centre, and our Volcano Duty Officers, and night-time file size with underexposed images has a real effect on performance.
We are planning how we can stream video from our webcams more regularly and integrating that into plans to upgrade our webcams. There will be a lot more interesting material to blog about when we get that work underway.
That’s it for now
This blog has been a bit of “grab bag” of new material about webcam images, particularly as we are using them to monitor eruptive activity at Whakaari/White Island. We are all familiar with taking photographs with our phones and having the phone do all the “magic” to give us a pretty decent image, but in monitoring volcanoes it is sometimes a little bit more complex. We hope you enjoyed a look into some of the details. If you use our webcam images, we would be grateful if you can cite us appropriately.
You can find our earlier blog posts through the News section on our web page just select the Data Blog filter before hitting the Search button. We welcome your feedback on our data blogs and if there are any GeoNet data topics you’d like us to talk about please let us know!
Ngā mihi nui.
Contact: info@geonet.org.nz